
 |
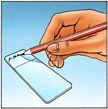
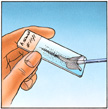
Step 1
Using a pencil, write the patient's name and birth date on the frosted end of the microscope slide. |
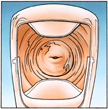 |
Step 2
Expose the uterine cervix to view and identify the cervical os. |
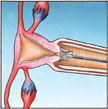 |
Step 3
Insert the central bristles of the brush into the endocervical canal. Use gentle pressure in the direction of the cervix until the lateral bristles bend against the ectocervix. |
 |
Step 4
Maintaining the gentle pressure, rotate the Cervex-Brush® four to five times in a clockwise direction, by rolling the shaft between thumb and forefinger. |
 |
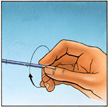
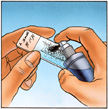
Step 5
Transfer the sample to the microscope slide with a painting action, applying first one side of the bristles and then the other. |
 |
Step 6
Immediately apply fixative to the slide. Special Note:
Maintain approximately 6" between slide and fixative spray bottle. Spray bottles are usually designed to deliver a very fine mist vs. a jet of fixative. The latter can result in cells being blown from the slide, resulting in a less than adequate smear. |
Click here to review procedure for collecting using TriPath's
(formerly AutoCyte) AutoCyte PREP Liquid-Based Pap System
Rovers® Cervex-Brush® should not be used after the first 10 weeks of gestation in pregnant patients. Caution: Federal law restricts this device to sale by or on the order of a physician.